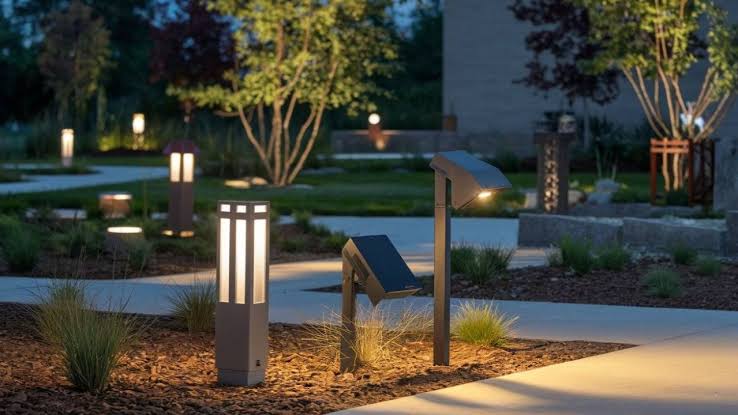
Outdoor lighting is no longer just about sticking a few solar stakes along a walkway or mounting a harsh floodlight over the garage. Modern landscape lighting is an art form. By utilizing low-voltage LED technology, you can transform your property into a stunning nighttime oasis, enhance home security, and extend your living space long after the sun goes down.
Whether you are a homeowner looking to elevate your curb appeal or a designer planning a backyard retreat, understanding the principles of low-voltage LED design is the key to a flawless installation.
Why Low-Voltage LED?
Before diving into design techniques, it is important to understand why low-voltage (12V–15V) systems have completely replaced traditional line-voltage (120V) systems for residential landscapes.
-
Safety First: Operating on just 12 to 15 volts, these systems pose virtually no risk of serious electrical shock. If a stray shovel nicks a cable while gardening, it won’t result in a dangerous hazard.
-
Energy Efficiency: LEDs consume up to 80% less energy than old halogen bulbs. A system that used to draw 500 watts can now run beautifully on less than 100 watts, keeping your monthly utility bill remarkably low.
-
Longevity: High-quality LED fixtures are rated to last between 30,000 and 50,000 hours. That translates to over a decade of maintenance-free illumination.
-
Design Flexibility: Low-voltage cables do not need to be buried deep in concrete or enclosed in rigid conduit. They require only a shallow trench (typically 6 inches), making installation around existing roots, hardscapes, and plantings incredibly easy.
Core Principles of Landscape Lighting Design
Great landscape lighting is defined as much by the shadows it creates as the light it casts. The goal is never to illuminate everything uniformly; it is to create depth, drama, and a seamless transition between the indoors and outdoors.
1. Establish Visual Hierarchy
When looking at your yard at night, your eye needs a place to land. Identify your primary focal points—perhaps a massive oak tree, a architectural stone pillars, or a water feature. Secondary focal points might include garden pathways or a textured retaining wall. Cooler, softer ambient light should fill the spaces in between to tie the scene together.
2. Composition and Depth
Avoid the “runway effect” where lights are placed in a straight, equidistant line. Instead, stagger your fixtures to create layers of light:
-
Foreground: Walkways, flowerbed borders, and low steps.
-
Midground: Specimen shrubs, patio spaces, and architectural features.
-
Background: The perimeter property line, tall privacy trees, or fences to prevent the yard from feeling like a black abyss.
3. Color Temperature Matters
Color temperature is measured in Kelvin (K). For residential landscapes, stick to the warm spectrum:
-
2700K (Extra Warm White): Matches the cozy glow of traditional halogen bulbs. Ideal for architectural features, brick, seating areas, and outdoor living spaces.
-
3000K (Warm White): A slightly crisper white that looks fantastic on green foliage, stone facades, and contemporary architecture.
-
4000K/5000K (Cool White/Daylight): Generally avoided in residential settings, as it can look stark, artificial, and overly commercial. The one exception is “moonlighting” high up in tree canopies.
Essential Landscape Lighting Techniques
Different features require different applications of light. Mixing and matching these techniques will give your design professional texture and balance.
Uplighting
The most common technique, uplighting involves placing a directional fixture (bullet light) at the base of an object and aiming it upward. This is highly effective for highlighting the texture of tree bark, architectural columns, or statues.
Downlighting and Moonlighting
Fixing a light high up in a tree or under the eaves of a roof and angling it downward creates a natural pool of light. If placed within the branches of a large tree, it casts beautiful, filtered shadows on the ground below, mimicking the natural look of moonlight.
Path and Area Lighting
Path lights feature shielded tops that direct light downward onto walking surfaces. Use these strategically to guide guests safely along walkways, near steps, or around patios. Remember to stagger them rather than placing them directly opposite each other.
Silhouetting and Shadowing
-
Silhouetting: Place a well-lighted fixture behind an object (like a manicured topiary) and aim it at a solid wall. This creates a striking dark outline of the plant against a brightly lit backdrop.
-
Shadowing: Place the fixture in front of an object and project its shadow onto a wall behind it. This works beautifully with delicate, airy trees like Japanese Maples when catching a gentle night breeze.
Wall Washing and Grazing
-
Wall Washing: Position a wide-angle floodlight a few feet away from a flat wall to deliver a smooth, even rinse of light across the surface.
-
Grazing: Place a directional light extremely close to a textured surface (like stacked stone or rustic wood) and point it straight up. This accentuates the heavy shadows and rich textures of the material.
Anatomy of a Low-Voltage System
To turn a design blueprint into reality, you need to understand the hardware required to build a reliable low-voltage system.
| Component | Purpose | Key Consideration |
| The Transformer | Steps down 120V household power to safe 12V-15V power. | Always choose a stainless steel, multi-tap transformer with room for future expansion. |
| Fixtures & Bulbs | The physical housing and light source. | Solid brass or copper fixtures age beautifully; avoid cheap plastic or aluminum. |
| Low-Voltage Cable | Carries power from the transformer to the fixtures. | Direct-burial landscape wire, usually 12-gauge ($12/2$) or 10-gauge ($10/2$). |
| Connectors | Joins fixtures to the main run of cable. | Must be completely waterproof (e.g., silicone-filled wire nuts) to prevent corrosion. |
Technical Design: Voltage Drop & Wiring
The most common mistake DIYers and novice installers make is failing to account for voltage drop. Because low-voltage electricity travels through relatively thin copper wires, it loses strength (voltage) over long distances. If your transformer outputs 12 volts, a fixture at the end of a 150-foot wire run might only receive 9 volts, causing it to look dim or flicker.
Calculating Your Load
To prevent voltage drop, ensure you do not overload your wire runs.
-
Add up the total wattage of all fixtures on a single cable run.
-
Measure the distance from the transformer to the last fixture.
-
Use a multi-tap transformer (which features 12V, 13V, 14V, and 15V terminals) to boost the starting voltage for longer runs, ensuring every fixture receives a steady 11V to 12V for optimal performance.
Smart Wiring Layouts
Instead of running one long daisy chain of lights, utilize smarter wiring configurations:
-
The T-Method: Run a heavy-gauge cable to the center of your display, then split it left and right into two smaller lines. This balances the electrical load evenly.
-
Hub System: Run a main line to a central, waterproof junction box (hub) hidden in the landscape. Connect multiple nearby fixtures directly to that single hub. This ensures every fixture receives identical voltage.
Step-by-Step Installation Roadmap
Once your design is finalized on paper, execution follows a logical sequence:
-
Placement: Set your fixtures in their tentative locations throughout the yard according to your design map.
-
Mounting the Transformer: Mount your transformer near an outdoor GFCI outlet. Leave it unplugged during installation.
-
Laying the Cable: Unroll your low-voltage cable along your fixture paths. Leave a little slack or a “loop” at each light fixture to allow for future adjustments or plant growth.
-
Making Connections: Use waterproof, silicone-filled connectors to splice each fixture into the main power line.
-
The Night Test: Before burying any wires, plug in the transformer and wait until completely dark. Walk the property to adjust aiming angles, fix glaring hotspots, and ensure the voltage is uniform.
-
Trenching: Once perfected, use a flat-edged spade to create a 6-inch deep trench, tuck the wires inside, and cover them with soil or mulch.
Maintenance and Longevity Tips
While low-voltage LED systems are incredibly durable, they are exposed to harsh outdoor elements year-round. A small amount of seasonal upkeep goes a long way:
-
Pruning: Regularly trim back fast-growing shrubs and ground cover that may block a fixture’s light path.
-
Lens Cleaning: Mineral deposits from sprinklers and dirt can cloud fixture lenses. Wipe them down with a mild vinegar solution twice a year to maintain peak brightness.
-
Straighten Fixtures: Lawn mowers, pets, and frost heaves can knock path lights askew. Periodically realign them so they sit perfectly vertical.
Final Thoughts
Low-voltage LED landscape lighting is the ultimate blend of aesthetics, utility, and safety. By mapping out a solid visual hierarchy, selecting high-quality brass or copper fixtures, and correctly managing your system’s voltage, you create an ambient, welcoming environment that completely reinvents your home at night. Step out into your yard tonight, look at it as a blank canvas, and start imagining where the light should fall.
